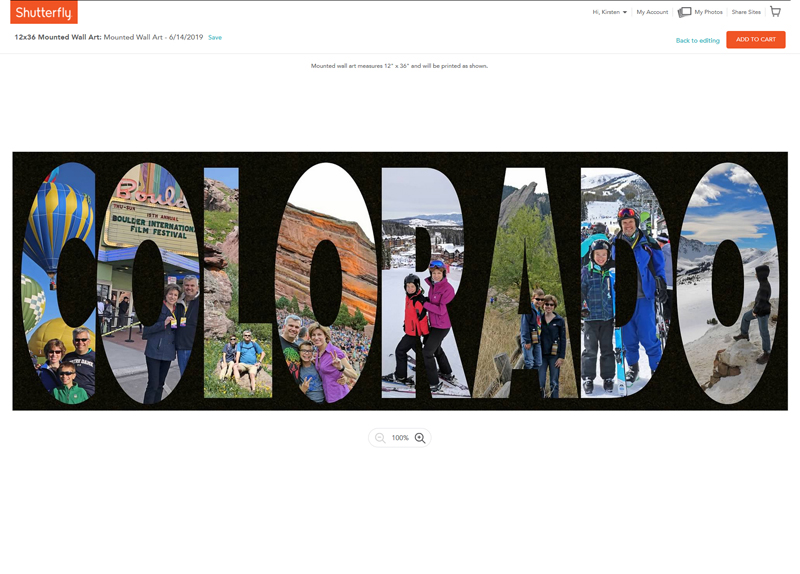
A more contained way to celebrate a place or theme with photos is to create a custom word mat that you have printed as wall art. Here are two themed pieces I have done for two of the places where my family has lived, and keep reading for step-by-step instructions on how to create your own!

Initial Preparation: there are lots of sizes and vendors you can use for creating wall art, but for my Word Mat pieces, I have used Shutterfly’s 12” x 36” mounted wall art (https://www.shutterfly.com/home-decor/wall+art+12×36–mounted-wall-art) that allows you to upload a single finished photo. If you plan to do the same, start with creating a new custom file in a program like Photoshop that is 36” wide and 12” tall and 300 dpi.

Choose a Word (Theme): in order to fit your word to the 12” x 36” size, the word should (probably) be no longer than eight letters, and you should use a nice thick font that allows your photos to show through. Some ideas for words/themes include: family (I ♥ MOM, I ♥ DAD, GRANDMA, etc); holidays (CHRISTMAS, BIRTHDAY, etc); sports (SKIING, SOCCER, FOOTBALL, etc); or places to which you have traveled or in which you have lived. For my example, I will use COLORADO with the font Futura Extra Black.
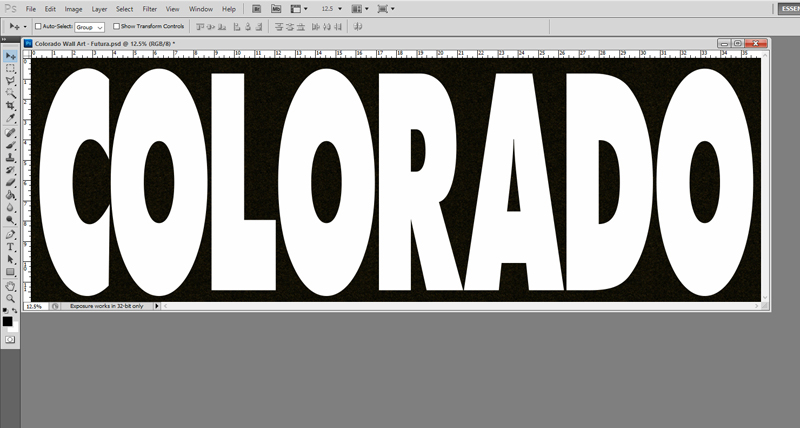
Prepare Your Word for Photos: In order to make your word fit correctly in the 12” x 36” space, you will likely need to manipulate the height and width of the letters. In Photoshop under “Character”, you can change those dimensions. In my example, I had to make the font height 225% and the font width 94%. You may also want to tweak the spacing between letters to make that look correct (I adjusted between each word individually). Once you have your word finalized, make a copy of your type layer, hide your type layer, then rasterize your copied layer (Layer-Rasterize-Type in Photoshop). Now you’re ready to cut out each letter individually: start with C, put a selection box around it, choose Edit-Cut, then Edit-Paste Special-Paste in Place. Rename the new layer with the letter, and you’re ready for your first photo! Drag your photo in, place it on the layer above your letter, then right-click and select “Create Clipping Mask”. Move your photo in place (you may have to change the size as well), and you’ve got your first letter! Continue the process for each letter.

Add Photos and Finish: Choosing the photos is the most fun (and often the hardest) part! You may find photos you like but don’t fit in your letters, and you may end up switching out photos for others as you go along (which is what I ended up doing). But eventually you will come up with a final product that you like! At that point, flatten your image and save it as a JPEG (in as large a size as you can, since it will be blown up to 12” x 36”). Then go to your printing company, upload your final photo, and you’re ready to order – congratulations!